software architecture

Types of coupling when integrating via the database

IntegrationDatabase or integration via database is a pattern best avoided. It is a pattern where multiple applications or services integrate via the database. In an extreme but unfortunately not so uncommon case, multiple applications share a table in the same database.
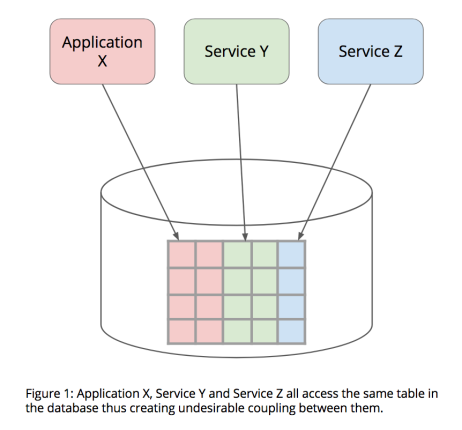
apps_sharing_a_column

In this post, I would like to talk about the various types of coupling created when multiple applications integrate via the same database. It is highly encouraged that a service or application owns its data. When a service owns its data, it creates explicit contracts through APIs that are business-truthful as opposed to implicit contracts via database tables that are more implementation detail.

Here are the various types of coupling.

  • Schema coupling. The shared database schema has to accommodate the needs of all the applications accessing the database. This means getting buy-in from all the consumers when changing database schema. A particular result of schema coupling is when you end up with sparse tables, where certain columns are only used by an application or a subset of the applications. This adds to the cognitive load of the team building applications that are not using those columns.
  • Data coupling. The data semantics in the tables also have to aligned across all the different applications. This can get quite hairy over time since the data semantics are part embedded in the database and part in the applications. Very often, I have seen states of a process being stored in the database like “Started”, “Processing”, “Finished” and being interpreted differently by different applications. It becomes very hard to change these states as they create a ripple effect across all the applications using it. It also can be tricky to add new states.
  • Abstraction coupling. When systems from outside the domain access the database tables of an application, it creates an abstraction coupling where the abstraction the external systems are coupled to is more of an implementation detail rather than a business-truthful abstraction. For example, when customers are exposed the “raw” inventory from the database for a given store when what they really want is “available to sell” inventory for the store. Available to sell inventory factors in store demand, lost inventory, damaged inventory, et al. When exposing the raw inventory, the customers then have to access other tables or build other logic to get to the available to sell inventory. Thus, exposing a business-truthful abstraction as a service such as available to sell inventory hides the inventory complexity inside the service and provides a way for the service to evolve the implementation over time. Also, thinking about a system interface in a business-truthful way, makes the system more widely understood and reduces cognitive load for developers consuming the abstraction. Hence, it is best to separate the system interface from the underlying implementation.
  • Deployment coupling. As a direct result of schema and data coupling, database changes have to be coordinated with all the systems accessing the database. Database is an implementation detail of the system. Changing the database should not require any release coordination with its consumers as long as the system interface has not been changed.
  • Runtime coupling. When multiple applications access the same database it is hard to scale or performance test those applications in isolation. To replicate “production load” for an application, you would have to create activity in all the applications hitting the database to truly understand the deadlocks/race conditions in that application. In essence, it becomes very hard to commit to SLAs for an application as there is very little isolation between the traffic coming from different applications.

Thanks for reading! Comments/feedback welcome.
Standard
Programming, software architecture

You will make mistakes just don’t make the expensive ones!

I have a friend who is a pilot and someone asked him “Aren’t most of the controls on the airplane running on auto mode then why do you get paid so much?”. His answer was “Well, I don’t get paid for the 99% of the times when things go right, I get paid for the 1% when things go wrong and in that case I am the difference between life and death.” Sometimes, I like to view my job as a technology leader through that lens – getting paid to avoid the most expensive mistakes. Although thankfully most of the times, I am not responsible for making life and death decisions. 🙂

Now ideally, you would want to avoid all mistakes. But the matter of fact is, that we cannot avoid all mistakes because we lack necessary context, or the skill set or just bandwidth. So whats the next best thing? I like to categorize mistakes by the cost of fixing them. Here is how I categorize mistakes: multi million dollar, a million dollar or a sub-million dollar mistake. These “buckets” come from the cost of the mistakes I have made personally or experienced from my day job of building software, typically for large, enterprise clients.

Now the question is how do we categorize mistakes?

I haven’t spent enough time thinking about the heuristics for these buckets but I have some examples:

  • Multi million dollar mistake. Not arranging your software by business concepts would be a multi million dollar mistake. This is the type of mistake that doesn’t instantly hurt and is hard to detect. It dramatically limits the organization’s ability to evolve over time. I bet everyone is doing this wrong, some to a lesser degree than the others and its really important to be on top of this one. This is the one that the organization’s CTO should be actively looking at.
  • Million dollar mistake. Not having the right logic in the right layers of your application/service would be a million dollar mistake. For example, your domain logic is embedded in your database and now your processing cannot scale until you scale your database, which means buying more licenses for your database.
  • Sub-million dollar mistake. God classes would be an example of sub-million dollar mistake. This is where there most of your business features depend on one class in your code base. It is very expensive to add new business features or maintain existing ones.

The categorization of the mistakes provides the necessary focus on the ones you should be avoiding – the most expensive ones and the rest you can choose to defer or deal with at the “last reponsible moment”. Avoiding the multi million dollar mistakes takes careful planning.

Going back to our examples,when looking at a particular software, you should be focusing on if the software is arranged by the business concepts (where Domain Driven Design thinking can be a huge help), before you get too deep into the weeds of the code and solving for God classes. If you spend your time wisely avoiding the multi million dollar mistakes, you could still end up with some God classes but at least it won’t be as expensive to fix them.

Standard
Craftsmanship

Feature tests as interactive documentation

Feature tests are written to test the behavior of the software and not its implementation. It is written in business friendly, domain language as far as possible. Gherkin is a language used commonly to write feature tests with cucumber as the framework that executes the feature tests. I use gherkin/cucumber for writing feature tests and as far as this post is considered I will use gherkin tests and feature tests interchangeably.

The use of gherkin tests as executable documentation is a fairly known idea. What I realized recently was the not only are these tests executable documentation but they are also interactive documentation. So lets take an example of a feature test that tests the conversion of inventory quantity of a product into inventory level.

Feature: Convert inventory quantity for a product into inventory level

Given that the inventory quantity for a product with SKU “1234567890123” is “10”
And the inventory level is “in stock” when the quantity is between “5” and “3”
And the inventory level is “low” when the quantity is between “2” and “1”
And the inventory level is “out of stock” when the quantity is between “0” and “0”
When I convert the inventory quantity for SKU “1234567890123” into its inventory level
Then the inventory level for SKU “1234567890123” is “in stock”

Now this feature gives me a fairly good idea of what the business expects and how the feature should be implemented. If I make a change to the code for this feature, and I run my test and the test passes most likely I haven’t broken anything. Executable documentation FTW!

To take this a step further, what I can do with this feature test is, interact with it. Lets say I am wondering how the code handles boundary condition. I could very easily change the quantity in the Given from 10 to 3 and observe what happens.

Given that the inventory quantity for a product with SKU “1234567890123” is “3”
And the inventory level is “in stock” when the quantity is between “5” and “3”
And the inventory level is “low” when the quantity is between “2” and “1”
And the inventory level is “out of stock” when the quantity is between “0” and “0”
When I convert the inventory quantity for SKU “1234567890123” into its inventory level
Then the inventory level for SKU “1234567890123” is “in stock”

If I get the same answer as before which is in stock then it seems the code is working correctly for boundary condition as well, where as if it is not then we have a bug.

I hope this non-trivial example has been useful to understand what I mean by interactive documentation. I have found this “tweaking” of tests to be very useful to understand how the code works or should work.

For a long time, I thought that if the product owner/business analyst is not involved in writing the feature tests then these tests are an overhead. But of lately, I have been of the opinion that these tests are useful even for developers. If you are someone like me who jumps between different code bases frequently then these tests help come up to speed quickly with the business functionality without having to worry about the implementation/code. Also, as mentioned in the example above, I can interact with these tests to validate existing/new behavior quickly. The importance of writing these tests in a easy to understand, domain language cannot be overstated.

Standard
Android, Design, Mobile

MDM Operation Processing

This is the fifth blog in the series on building custom MDM solution. This blog will talk in detail about the implementation of the operation processing workflow.

The operation processing workflow is represented by a state machine on the server. Here is how it works.

When the admin creates new operations for the device, the default state they start with is ‘pending’. When the devices get the notification, they request for operations. At this point, the ‘pending’ operations are returned to the tablet. When the device finishes processing the operations, it sends the status back to the server. Based on the status of the operation, the operation is marked as ‘success’ or ‘failure’. If the tablet is not able to finish processing the operation in a configurable amount of time, it is set to ‘timed out’.

One thing to note, is we do not make a distinction between newly created operations and that are currently being processed by the tablet. They are both represented by ‘pending’ state. This is intentional because from a operation processing workflow they are both the same. This means that every time the operation asks for its operations, we will be returning new operations and the ones it might already be processing. This works great for error conditions. It is possible that the tablet might have crashed while processing one of the operations and hence did not get a chance to acknowledge its status. In that case, the next time the tablet comes for its operations, it will be returned the pending operation. There is no downside to processing the same operation twice. In that respect, the operations are idempotent.

There is another state machine we use for the ‘notification workflow’. It is maintained on a per device basis. Here is how it works.

When new operations are created for a device, we mark the device as ‘notification required’. When notification is sent to the device, it is marked as ‘notification sent’. When the device comes to get its operations, it is marked as ‘notification not required’. If the device never comes to get its operations, because it is switched off or something like that, it is marked as ‘notification timed out’.

The notification workflow is implemented via a background job. It sends out notifications to the devices and manages the state machine. In addition, it also marks operations that have timed out accordingly.

Standard
Android, Design, Mobile

MDM Tablet compliance

This is the fourth blog in the series on building custom MDM solution. In this blog, I talk a little in depth about the operation processing workflow and how it is used to determine ‘compliance’ of a tablet.

But why is ‘compliance’ important?

Compliance will tell the admin if a device needs any action or not. There are 4 states of compliance that a device can be in.

‘Compliant’ means no action needs to be taken. ‘Non-compliant’ means the device is not in the expected state. ‘Rooted’ means the device has been rooted and is open to manipulation. These devices should be acted upon urgently to avoid any misuse. ‘Unknown’ means the device has not been out of contact for a specific amount of time, in our case, it is 60 minutes. If a device is ‘non-compliant’, additional information is provided to help the admin resolve the issue.

So how do we go about determining compliance?

To understand compliance, we need to understand the categories of operations. The two categories of operations are ‘one-time’ and ‘persistent’. The one time operations are transient and help with diagnosis or maintenance of a tablet. Examples include ping the device to get its information, unlock the device, unblock the settings, reset the pin on the device. Persistent operations are the ones that define the expected state of the tablet. Examples include, contents on the tablet, password policy of the tablet, et al.

Only the persistent operations contribute towards the compliance of the tablet. If all the persistent operations are executed successfully by the tablet, it is said to be compliant.

As a side note, persistent operations are created for a group of devices, viz., a school, district, et al whereas one time operations are created at a individual device level. The composition of the group of devices can be static, students belonging to a school or dynamic, 6th grade students in a district.

Standard
Android, architecture, Design, Mobile, Programming

MDM Operation serialization

This is the third blog in the series on building custom MDM (Mobile Device Management) solution for Android tablets. The first blog gives a general overview of the MDM solution and talks about the server architecture. The second one is about the Android MDM agent architecture.

The high level idea is that we have an MDM agent that runs on the tablet, fetches ‘operations’ from the MDM server, executes them and returns back the status to the server. In this blog, I will be talking about some implementation specific details on the Android MDM agent, specifically around serializing the processing of ‘operations’, which required us to implement multi-threaded synchronization in Android.

To start with, what are operations?

Operations are tasks that the server wants the tablet to execute, for example, set password policy, install an application, block settings on the tablet, et al.

So, what’s the problem?

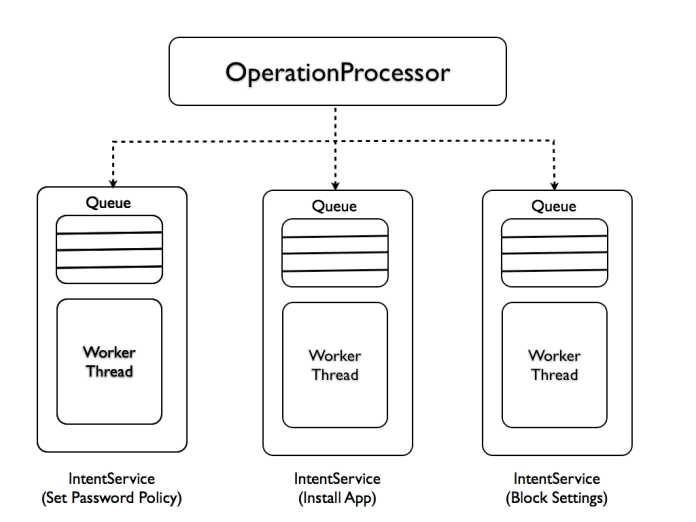
The problem is making sure, during the operation processing on the tablet, only one operation of a given type is executed at any given point in time. This means that two PasswordPolicy operations should not be executed at the same time. It is ok though, to have a PasswordPolicy operation execute in parallel with InstallApp operation. In fact, that is desirable. Executing operations of the same type in parallel has a serious drawback.

Race condition

Lets say the operation being executed in parallel is the PasswordPolicy operation. One of the operation wants to apply the password policy as Normal (4 digit password) whereas the other wants it to be Strong (6 alphanumeric password). Now based on which one gets executed last, the password policy will be set on the tablet and not necessarily the one that the server generated last. Worse the server could get out of sync with the tablet, based on which operation sent its status last.

So, what’s the solution?

Enter Android. As mentioned before, the MDM agent is an Android component. Android provides the IntentService that can solve a similar problem. Its basically a Service that processes one Intent (asynchronous request) at a time. It maintains a queue for the incoming Intents and spawns a single worker thread to process them sequentially. It provides a method for handling the Intent. Once the method is executed, it will pick up the next Intent waiting on the queue. Sounds like what we want, right? All we do is create an IntentService for each of the operation types and just keep firing Intents at the appropriate IntentService, as and when the operations arrive. Here’s how it would look.

mutlithreaded-serialization-naive

But wait! There is always a but, in’it?

What’s the problem now?

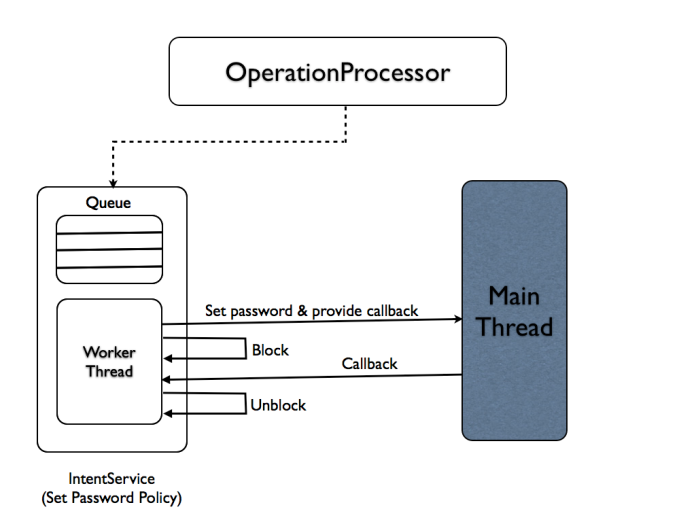
Enter multi-threading. Some of the operations have to jump to another thread to finish their processing, viz., the Main thread, also known as the UI thread. Android mandates that all UI activities be performed on the Main thread. So, our PasswordPolicy operation would go on to the Main thread to show the dialog box for changing the password to confirm to the new password policy. When the control is passed to the Main thread, the worker thread thinks that its done, without waiting for the response from the Main thread. It happily continues processing the next operation, while the previous one could still be waiting for a user response on the Main thread. Damn! Serialization in multi-threaded environment is not easy.

So now, what do we do?

Now what we do is, block the worker thread until the Main thread has finished doing what its doing. We provide a callback when we jump off of the worker thread. When the main thread finishes, the callback is called which unblocks the worker thread, performs finish up activities for the operation (sending status to the server) and then releases control. Android will pick up the next Intent and process the next operation. Mission accomplished! 🙂 Here is a pseudo sequence diagram for doing it.

mutlithreaded-serialization

We could have implemented this in a purely non-blocking way, by having the finishing operation trigger the next one. This way though its hard to have expiration time on the operation processing since it moves between threads. Blocking makes it very easy to do that. We use the Java CountDownLatch with a timeout on it for blocking the thread. Also conceptually its easier to understand. And since its a background/worker thread its not such a big deal blocking it.

Thanks for reading! Comments/suggestions welcome.

Standard
Android, architecture, Design, Mobile, User Experience

MDM Tablet Architecture

This is the second part of my blog series that talks about building a custom MDM (Mobile Device Management) solution. If you haven’t read the first part, you should check it out here.

As mentioned in the previous blog, as part of the MDM solution, we have the MDM agent running on the tablet that fetches operations from the server, executes them and returns back status of the operations to the MDM server. As a quick reminder, here are some examples of these operations:

  • Silent installation of application/s
  • Block settings on the tablet
  • Block application/s on the tablet
  • Reset the pin on the tablet
  • Factory reset the tablet

In this post, I am going to talk about how we realized the implementation of some of these challenging operations.

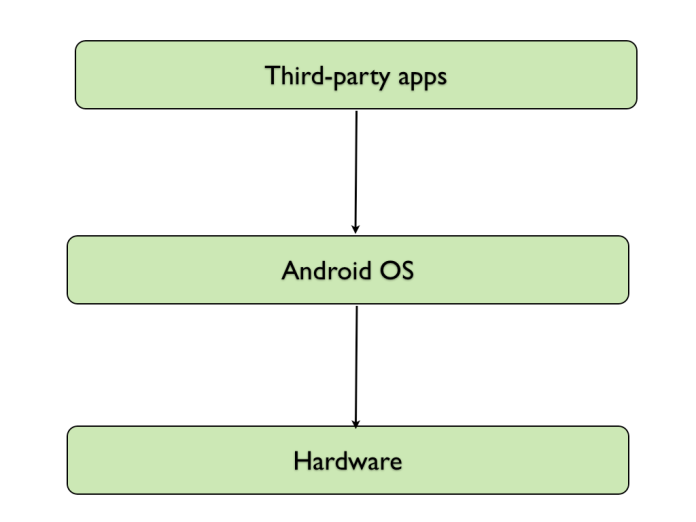
So, to put things in context, if you are developing a regular Android application, you would have access only to Android’s publicly exposed APIs. Your architecture would look something like the one below.
normal-app-tablet-architecture

But when you are building an MDM agent, the publicly exposed APIs are not sufficient for implementing some of the operations. So, for example, if you wanted to silently install an application (install happens in the background, without the user knowing about it), there is no public API to do such a thing. But if you look at the source code of Android there exists a method that does exactly that. Now what do we do?

Now here is where we need to broaden our horizon a little bit. As I mentioned before, we are responsible for the end-to-end solution, hardware and software. This gives us great leverage in terms of customizing the Android platform and here is how we do it.

We work directly with the hardware vendor for procuring the Android devices. The devices come with an Android system image that is built specifically for our needs. A system image is a combination of the Android operating system, OEM (Original Equipment Manufacturer, in this case, the hardware vendor) applications, device specific drivers, et al. As we all know, Android is an open source platform and hardware vendors are free to customize it, as long as it satisfies Android’s CTS (Compatibility Test Suite).

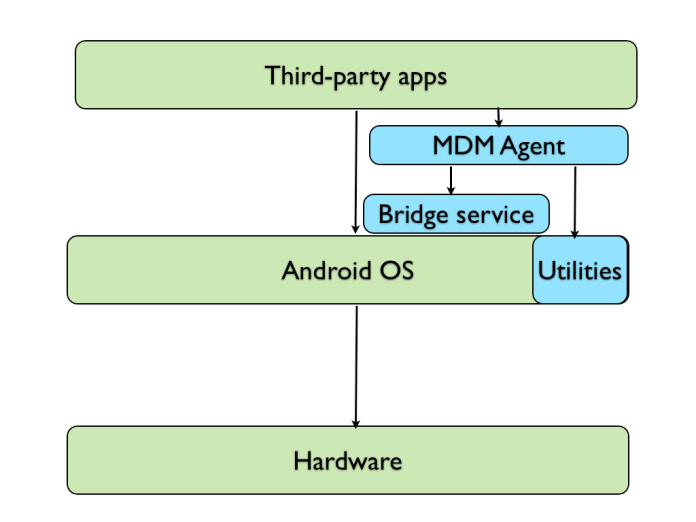
We built an Android service that would expose some of the non-publicly available Android APIs. Lets call it the “bridge service”. We handed this service over to our hardware vendor for it to be included in our custom system image. Including the bridge service in the system image, gives it access to Android’s non-public APIs, since the service will be considered part of the Android operating system. This bridge service will in turn be accessed by our MDM agent for realizing the implementation of some of the operations. And boom, there you go! Now we have access to Android’s non-public APIs.

We did not stop with just exposing non-public APIs; we went one step further. We have some custom Android components included in the system image. For example, one of the business requirements is to, only allow certain applications to run on the tablet. For this, we have a App Killer utility that kills applications that are not part of a “allowed apps” list. This list is fetched from the MDM server as part of an operation and fed to the App Killer utility on the tablet.

Some of the other requirements, like blocking certain settings on the tablet, are implemented by overriding the Settings application code that’s part of the Android operating system. With all these customizations, this is how our architecture looks like.

mdm-tablet-architecture

Its a pretty cool realization that we can do anything we want with the Android operating system! :). But, of course, all of this, comes at a cost.

First of all, this bridge service presents a security risk and we mitigate it by making sure that it can only be accessed by our MDM agent. The other big concern is that, when Android changes one of these APIs, which they are free to do, since they are not publicly exposed, we would have to make corresponding changes to our bridge service. Also, working out the logistics hasn’t been easy, primarily due to the long feedback cycles involved in testing the integration between system image, bridge service and the MDM agent. Each of the system image changes have to be certified by Google by passing the CTS, which adds to the delay. Making changes to the system image requires us to go back to the hardware vendor which is time consuming. At the moment, it takes the hardware vendor roughly about 3 days to turn over a single system image change, depending on the complexity of the change. Hence, we have to plan these changes well in advance.

But when you are building a mobile device management solution, you need these capabilities. It has made a vast improvement in the user experience for the tablet users. So for example, on the tablet, we can silently install applications without the user having to go through the normal process of clicking OK button on multiple screens. Imagine if the user has to do this for 100s of applications! At that point, it becomes a necessity as opposed to a ‘nice-to-have’.

Its been incredible fun “hacking” with the Android operating system. I hope you have liked the blog. Feel free to let me know what you think. Thanks for reading!

Standard
Android, Design, Mobile

MDM Introduction

This is the first blog in the series on building a custom MDM solution.

First of all, what are we trying to build?

We are building an instructional platform for K-12 education based on Android tablets. These tablets will be used by teachers and students, primarily in a classroom. The tablet helps the teacher in facilitating a class and provides various tools and applications to interact with the students and help them learn better.

So, what is a MDM and why do we need it?

MDM stands for Mobile Device Management. Given that these tablets will be deployed in various schools, the MDM solution lets us manage them remotely. This includes downloading various learning content, installing educational apps, setting password policy on the tablet, et al, remotely. Because the tablet is used in a school environment, the MDM solution is also responsible for providing a safe and secure container for running the applications. This includes enabling/disabling certain settings on the tablet. The MDM solution also provides a single sign on solution for the tablet user. This allows us to capture the user credentials once and use it for the course of the user’s lifetime. This also gives us the ability to customize the content on the tablet to that specific user.

So, how did we implement it?

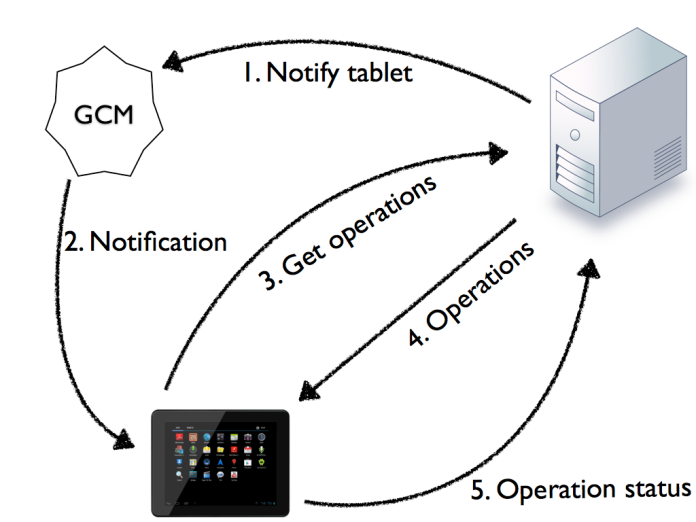
mdm-server-architecture

The MDM solution has two primary components, first, the MDM agent, that lives on the tablet and second, the MDM server. At a high level, an Admin user interacts with the MDM server to perform an “operation” on a tablet (or a group of tablets) via a web portal. An example of an operation would be “install an application” on a tablet. In order to execute this operation, the MDM server notifies the tablet via GCM, the MDM agent on the tablet receives the notification, requests the MDM server for its operations via HTTP, the MDM server sends the operations and then the MDM agent executes those operations on the tablet and sends the status back to the server. The status is then displayed to the Admin user on the web portal.

Other examples of operations include:

  • Blocking the settings on the tablet
  • Enabling VPN
  • Reset the password on the tablet
  • Sending a message
  • Unregistering the user on the tablet
  • Factory resetting the tablet

and many more.

In order to build some resilience in to the system, we have introduced retry mechanism on the server. If the server does not get a response from the tablet in a configured amount of time, we retry sending the notification to the tablet. We have also built some “pull” in to the tablet, which means, every time the tablet is rebooted, it will request for its operations from the server. The operations are idempotent which means if they are executed multiple times, the end system state is the same.

In the next part, I will talk about the tablet architecture, which requires some cool “hacking” on the Android operating system. Here’s how!

Standard
Android, architecture, Design, Mobile

Mobile Device Management

For the last year or so, I have been incredibly lucky to be working on building a custom MDM (Mobile Device Management) solution for Android tablets. This is a blog series, where I talk about the general architecture of the MDM solution and the specifics of the Android tablet component and the server component of the MDM solution.

Its broken down in to 5 parts. Here they are:

Introduction
Tablet Architecture
Operation Serialization
Tablet Compliance
Operation Processing Workflow

Hope you enjoy the series. Comments welcome.

Standard
architecture, Craftsmanship, Design, Java, Refactoring

Soul coding

Yesterday I had a 12 hour non-stop[1] code fest to refactor a thin slice of 2-tiered web application into a 3-tiered one. It was very productive and I must say this is the kind of stuff that soothes my developer soul and hence the name. 🙂

The primary driver for the refactoring was that the core logic of the application was tightly coupled on both ends to the frameworks being used. On one side, it was tied to the web application framework, Play and on the other end the ORM, Ebean. We managed to move the business logic in to a separate tier, which is good on it own, but also let us unit test the business logic without bothering with the frameworks, which can be frankly quite nasty. As a follow on effect, we also managed to split the models into 2 variants, one to support the database via Ebean and the other to generate JSON views using Jackson. This let us separate the two concerns and test them nicely in isolation. Similarly, we could test the controllers in isolation. We got rid of bulk of our functional tests that were testing unhappy paths for which we had unit tests at the appropriate place viz., the controller, view model, service and database models.

I was quite amazed at how much we could get done in a day. Here are some of the important take aways from this experiment:

  • We had a discussion the previous day about how we wanted to restructure the code, primarily focusing on separation of responsbilities and improving unit testability of the code. We agreed upon certain set of principles, which served as a nice guideline going into the refactoring. On the day of refactoring, we realized that not all the things we discussed were feasible, but we made sensible adjustments along the way.
  • Keep your eye on the end goal. Keep reminding yourself of the big picture. Do not let minor refactorings distract you, write it down on a piece of paper so you dont forget.
  • Pairing really helps. If you are used to pairing, when you are doing refactoring at this scale, it doubly helps. Helps you keep focused on the end goal, solves problems quickly due to collective knowledge and also decision making cycle time is considerably reduced when making adjustments to the initial design. Also I would say pick a pair who is aligned with you on the ground rules of how you are going to approach development. You don’t want to get into a discussion of how or why you should be writing tests and what is a good commit size.
  • Having tools handy that get you going quickly. Between me and my pair, we pretty much knew what tool to use for all the problems at hand. At one point, we got stuck with testing static methods and constructors. My pair knew about PowerMock, we gave it a spin and it worked. And there it was, included in the project. Dont spend too much time debating, pick something that works and move on. If it does not work for certain scenarios, put it on your refactoring list.
  • Thankfully for us, we had a whole bunch of functional tests already at our disposal to validate the expected behavior, which was tremendously useful to make sure we weren’t breaking stuff. If you dont have this luxury, then pick a thin slice of functionality to refactor which you can manually test quickly.
  • Small, frequent commits. Again the virtuosity of this is amplified in this kind of scenario.
  • Say no to meetings. Yes, you can do without them for a day, even if you are the president of the company. 🙂

Have you done any soul coding lately? 🙂

[1] Ok, not quite 12 hours, but it was on my mind all the time. 😉

Standard